

- ★Product Description
- ★About us
- ★Custom cable
DESCRIPTION
The ESP8266 ESP-01 is a serial to WiFi breakout module with a built in ARM microprocessor that has 1MB of memory and 2 GPIOs brought out to the header for connecting to peripherals. It can be used as a serial to WiFi bridge to add WiFi capability to a project or it can even be programmed directly and used as a little stand-alone processor. It has full TCP/IP capability built-in.
PACKAGE INCLUDES:
- ESP8266 ESP-01 WiFi Module
KEY FEATURES OF ESP8266 ESP-01 WIFI MODULE:
- 32-bit RISC Tensilica Xtensa LX Processor running at 80MHz
- 1MB Flash Memory
- IEEE 802.11 b/g/n WiFi
- 2 GPIO
- 3.3V Operation
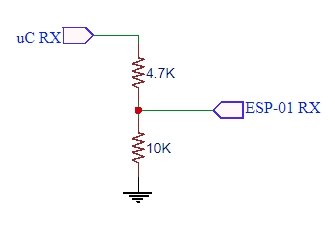
The module requires 3.3V for power and is not 5V tolerant on its pins. If connecting to a 5V MCU, the RX pin of the ESP-01 module which is driven by the TX pin from the MCU should have a level shifter installed. This can just be a simple voltage divider using 2 resistors as shown down below. If you are using it with our ESP-01 adapter, the adapter includes level shifting as well as a 3.3V regulator, so it makes the ESP-01 module plug-n-play.
The module has a red power LED and a blue LED to indicate data flow. The WiFi antenna is the meandering PCB trace that covers the end of the module.
The ESP8266 in the name refers to the 32-pin Espressif IC on the module. These chips are quite capable and support up to 16 GPIO. The ESP-01 is the most basic and least expensive implementation of this chip with limited GPIO and is best used for adding WiFi to an existing Arduino or similar MCU board. If you are are looking to use it as a stand-alone device, you will typically be better off starting with something like the NodeMCU or ESP32 that we sell which includes all the features of a full microcontroller like the Arduino and can be programmed directly from the Arduino IDE.
From the factory, the modules are loaded with “AT” firmware and can be programmed via a simple terminal program. If you are using the module primarily to exploit its WiFi capabilities and are controlling it with another MCU like an Arduino, that may be all that you need.
If using with custom software programmed onto the device, it can be programmed using the Arduino IDE but it will require the use of a FTDI USB to Serial interface.
The module has a 2×4-pin header on the assembly. See pic for layout as the boards may not have the pins labeled.
2 x 4 Header:
- GND = Ground. Connect to ground on MCU
- GPIO2 = General Purpose Digital I/O
- GPIO0 = General Purpose Digital I/O
- RX = Receive Data. Connects to RX on MCU
- TX = Transmit Data. Connects to TX on MCU
- CH_PD = Enable / Power Down. Must be pulled to 3.3V directly or via pull-up resistor to enable
- RST = Reset. Active low, must be pulled to 3.3V directly or via pull-up resistor
- VCC = 3.3V. Can draw up to 200mA worse case.
OUR EVALUATION RESULTS:
These are interesting devices that pack a huge amount of functionality into a tiny device. Fully exploring their potential takes a little more dedication than your typical widget so be prepared to do some on-line research to fully tap into these things.

To get your toe wet in the ESP8266 ESP-01 world, follow the steps below to do a basic functionality test using the AT software that comes loaded on the module to scan for wireless networks in your vicinity.
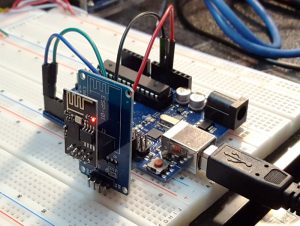
If you use the adapter board available below, hooking up the ESP-01 is very easy and just requires 4 lines. If you are wiring up the module directly, the double-row of pins are not breadboard compatible so you will need to use male to female jumpers or similar to connect to the pins on the module.
When wiring up the module, if you are wiring direct without the adapter and using a 5V MCU be sure to use a voltage divider between the MCU RX pin and the ESP-01 RX pin as shown to the right. The resistor values are not critical. Basically you want to have the value of the top resistor to be about 1/2 that of the bottom resistor with a total resistance large enough so that we aren’t overtaxing the output drive of the TX pin. If you are using our adapter module, it includes level shifting, so this circuit is not required.
For this test, using the 3.3V output from the Uno will usually work well enough. For any serious use, a separate 3.3V power supply is generally required as the current draw of the module can get up to 200ma during some transmitting conditions. The adapter module we sell includes a 5V to 3.3V regulator which makes powering this module easy and you can run it off the 5V output of the MCU .
Now load a blank sketch into the Arduino as shown here. This is the sketch you get when you chose File / New on the IDE. This is done to basically take the Arduino out of the circuit.
void setup() {
  // put your setup code here, to run once:

}

void loop() {
  // put your main code here, to run repeatedly:

}
Our example here will work with any Arduino that has a USB and hardware serial port though we happen to be using an Uno.
Note: You need to upload the sketch before you connect the ESP-01 module to the TX/RX lines or else the download will fail.
If you are connecting directly to the module connect the following lines between the Uno and the ESP-01 module as shown in the table below.
Note: The TX and RX lines connect directly across e.g. TX -> TX. Do not criss-cross them as you normally would.
| Uno | ESP-01 Module |
| RX (pin 0) | RX – Use a voltage divider as shown if using a 5V MCU |
| TX (pin 1) | TX |
| 3.3V | VCC |
| GND | GND |
| RST – Can leave floating or pull up to 3.3V | |
| 3.3V | CH_PD. This can connect directly to 3.3V or can be pulled up using a resistor |
If you are using the adapter board, you can connect as shown below
| Uno | ESP-01 Adapter Board |
| RX (pin 0) | RX |
| TX (pin 1) | TX |
| 5V | VCC |
| GND | GND |
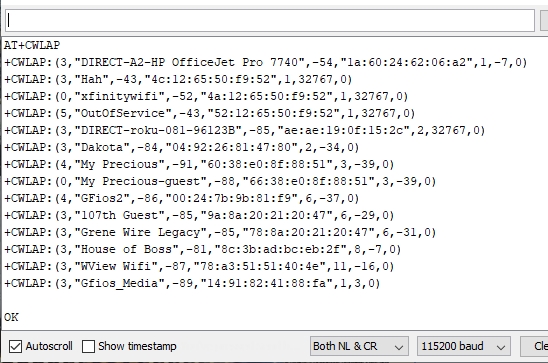
In this setup, you are simply using the Arduino to power the ESP-01 and to physically connect the USB through the USB converter IC to the serial lines on the ESP-01. We need to set the Serial Monitor window to the properties that the ESP-01 requires. Open the Serial Monitor window and set for 115200 baud and Both NL & CR. You will type the AT commands into the upper window and any ESP-01 responses will appear in the main window.
Typing ‘AT‘ followed by a return should result in an ‘OK‘ response from the ESP-01 module. If you don’t get an ‘OK’, double-check your connections. Make sure you have the TX -> TX and RX -> RX (not criss-cross) and the ESP-01 pins have pull-ups where required.
Scanning for wireless networks
There are many guides on the internet that cover using the ESP-01 module. For our purposes here, we will simply scan for wireless networks within range of the ESP-01.
The ESP8266 ESP-01 module has three operation modes:
- Access Point (AP)
- Station (STA)
- Both
In AP mode the WiFi module acts as a WiFi network, or access point (hence the name), allowing other devices to connect to it. It establishes a two way communication between the ESP-01 and the device that is connected to it via WiFi.
In STA mode, the ESP-01 can connect to an AP such as the WiFi network from your house. This allows any device connected to that network to communicate with the module.
The third mode of operation permits the module to act as both an AP and a STA.
For our example, we will use the STA mode of operation. To set the module to STA mode, type the following command:
AT+CWMODE=1
For this command STA = 1, AP = 2 and Both = 3
To verify what mode you are in, type the following command:
AT+CWMODE?
It should return ‘CWMODE:1‘
Now to scan for WiFi networks, type the following command.
AT+CWLAP
After a couple of seconds you should get see a list of the available WiFi networks in the Serial Monitor window similar to what is shown here.

If you really want to geek out, the complete AT command set can be found here: AT Commands
As noted before, it is also possible to replace the AT command set with a custom C program or LUA code that is downloaded into the ESP-01 via the Arduino IDE. You can also write a program for the Uno that sends the AT commands to the ESP-01 via a serial port.
BEFORE THEY ARE SHIPPED, THESE MODULES ARE:
- Sample inspected and tested per incoming shipment
Notes:
- None
TECHNICAL SPECIFICATIONS
| Microprocessor | 32-bit RISC Tensilica Xtensa LX106 running at 80MHz | |
| Memory | Instruction Ram | 64KB |
| Program Ram | 96KB | |
| Flash | 1MB | |
| Network | IEEE 802.11 b/g/n WiFi | |
| GPIO | 2 | |
| Operating Ratings | ||
| Vcc | 3.3V | |
| Ityp | Tx802.11b, CCK 11Mbps, P OUT=+17dBm | 170mA |
| Ityp | Rx 802.11n, 1024 bytes packet length, -65dBm | 56mA |
| Ityp | Deep Sleep | 10uA |
| Dimensions | L x W (PCB) | 25mm x 15mm (1.0 x 0.6″) |
| Country of Origin | China | |
| Datasheets | Espressif Website |
FURTHER READING
Martyn Currey has an excellent series of articles related to using wireless communications, especially with Arduino. This is a link to a series of his articles related to the ESP8266


