

- ★Product Description
- ★About us
- ★Custom cable
Microphone and adjustable audio preamplifier in a compact easy to use package
DESCRIPTION
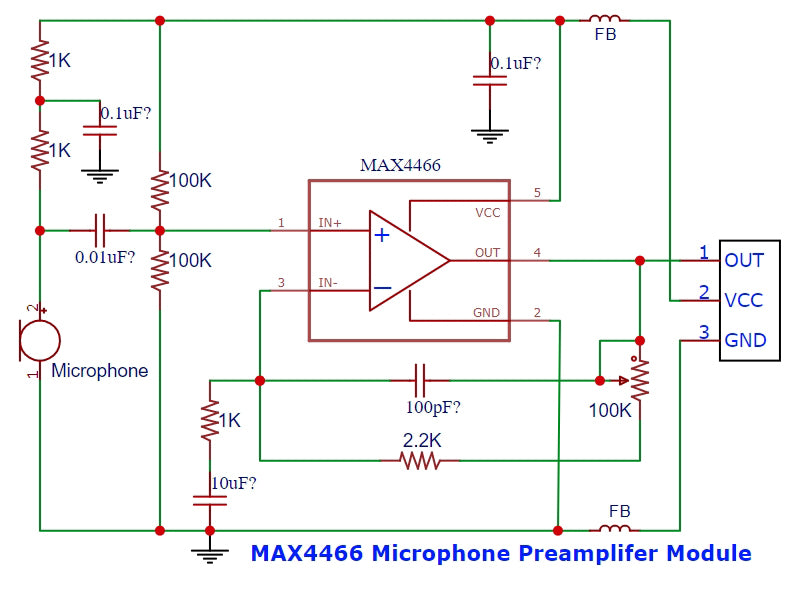
This module incorporates a microphone and the MAX4466 audio preamplifier IC with adjustable gain in a compact easy to use package.
PACKAGE INCLUDES:
- MAX4466 Microphone Preamplifier Board w/ microphone
- Male header strip
KEY FEATURES OF MAX4466 MICROPHONE PREAMPLIFIER MODULE:
- Small form factor
- 25x to 125x adjustable gain
- Very low quiescent current
- Rail-to-rail output swing
- DC coupled output
- 2.5 to 5.5V operation
These modules can be used in audio recording and sampling applications as well as audio reactive projects. The output can feed an amplifier module to drive speakers or can feed an ADC input on an MCU for sampling the waveform.
The module utilizes the Maxim MAX4466 preamplifier IC along with a microphone and the support resistors and capacitors to create a complete preamplifier assembly.
The module includes ferrites on both the Vcc and ground leads to minimize power supply noise. If using with an MCU, it is best to use the quietest power supply available in the 2.4V – 5.5V range. On an Arduino, this is typically the 3.3V power supply.
The output is DC coupled. When the output signal is at rest, it will sit at Vcc/2. If Vcc is 5V, the output will sit at 2.5V. If the output needs to be AC coupled, a 100uF capacitor can be added between the output pin and the input of the circuit that it is driving.
A small single-turn potentiometer on the back allows you to adjust the gain from 25x to 125x. Turning the pot CCW increases the gain while turning CW decreases the gain.
Module Connections
The connections to the module are simple. Just supply 2.4 to 5.5V power and ground and then run the analog output to where you need it.
1 x 3 Header
- OUT = Output typically connects to MCU analog input or other analog input device or circuit
- VCC = VCC connects to 2.4V – 5.5V
- GND = Ground connects to ground
OUR EVALUATION RESULTS:
These are nice little modules with good build quality.
Below is a scope capture with a 500Hz tone being detected. Amplitude in this case is about 680mV, but will obviously vary depending on the sound volume as well as the setting of the adjustable gain potentiometer.

Checking the Output
To get it up and running with an MCU, simply hook the module up to 3.3V and ground and connect the Output pin to an analog input pin such as A0.
In this program, we also set it to use an external AREF voltage for the ADC reference voltage, so you will need to jumper from the 3.3V to the AREF pin on the Arduino.
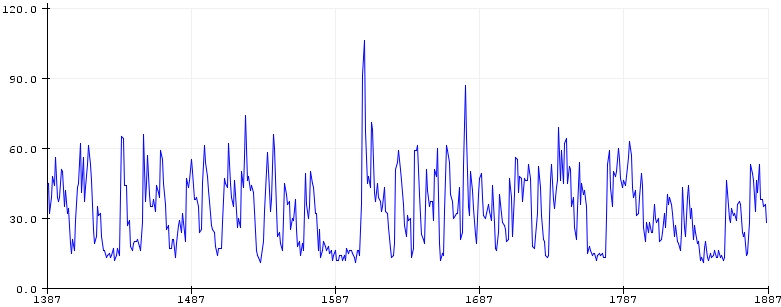
The program below measures the relative sound level that the microphone picks up. It takes multiple samples during a sample window which is set to 25mS and keeps track of the maximum and minimum sound levels measured during that sample window. It then sends the difference between these two measured values out to the Serial Plotter window for display.

MAX4466 Test Program
/*  MAX4466 Test Program
    Basic code to test the MAX4466 Microphone Preamplifier Module
    Connect to 3.3V, Gnd and Out goes to A0
    Connect 3.3V to AREF input to use 3.3V for ADC operation
    Open Serial Plotter window to observe the average audio amplitude.
*/
int const SAMPLE_WINDOW = 25; // Sample window width in mS (50 mS = 20Hz)
int const PREAMP_PIN = A0;      // Preamp output pin connected to A0
unsigned int sample;
//===============================================================================
//  Initialization
//===============================================================================
void setup()
{
   analogReference(EXTERNAL); // Connect 3.3V to AREF to provide reference voltage
   Serial.begin(9600);
}
//===============================================================================
//  Main
//===============================================================================
void loop()
{
   unsigned long startMillis= millis();  // Start of sample window
   unsigned int amplitude = 0;   // peak-to-peak level

   unsigned int soundMax = 0;
   unsigned int soundMin = 1024;

   // collect data for 50 mS and then plot data
   while (millis() - startMillis < SAMPLE_WINDOW)
   {
      sample = analogRead(PREAMP_PIN);
         if (sample > soundMax)
         {
            soundMax = sample;  // save the maximum levels
         }
         else if (sample < soundMin)
         {
            soundMin = sample;  // save the minimum levels
         }
      }
   amplitude = soundMax - soundMin;  // max - min = peak-peak amplitude
   Serial.println(amplitude);
   }
BEFORE THEY ARE SHIPPED, THESE MODULES ARE:
- Sample inspected and tested per incoming shipment
Notes:
- None
TECHNICAL SPECIFICATIONS
| Maximum Ratings | ||
| Vcc | 2.4 – 5.5V | |
| IMax | Maximum Current Draw | 60uA |
| Operational Ratings | Voltage Gain | 25x to 125x user adjustable |
| Common Mode Rejection Ratio | 126dB (typ) | |
| Power Supply Rejection Ratio | 112dB (typ) | |
| Bandwidth | 600kHz | |
| Dimensions | L x W (PCB) | 21 x 13.5mm (0.83 x 0.53″) |
| Country of Origin | China | |
| Datasheets | Maxim Microphone Preamplifier | MAX4466 |


